I'm curious to know how many photographers or aspiring photographers read my blog. For anyone who's tech savvy, into digital photography, or is simply interested in what happens in between me taking a photograph and you receiving a print, read on! Today's entry is about my work-flow. Does it make me a nerd that I'm excited to share what I feel is an efficient, smart work-flow? It seems to work well and save on time, despite my sloooow laptop. I'm hoping to upgrade to the 21 or 72 inch iMac sometime this year....oh what delight!
I would love to be a source of information to others and share some tips I've learned along the way. I'm so thankful for all I've learned and hope to share some advice to make someone else's process easier.
OK, here's my process from capture to final backup. I've included plenty of screenshots for those of you who are visual like me. : )
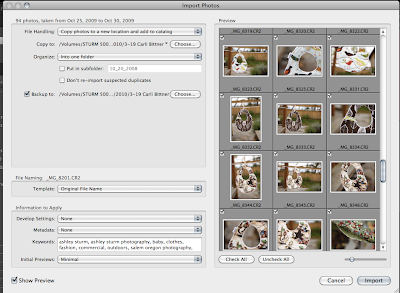
1. Import RAW images into Lightroom, checking the following menu options:

a. File Handling: Copy photos to a new location and add to catalog.
b. Copy to: (Here's the filing system I use): External Hard-drive/Ashley Sturm Photography/Images/Work-Portraits/2010/03-19 Client Name, Shoot Type. (This really keeps everything nice and organized!).
c. Organize: Into one folder.
d. Backup: I do one backup to my 1TB external hard-drive, using the same filing system as above. The other backup is on my CF card for a few days.
e. File Name: leave as original.
f. Information to apply: Under Keywords I input relevant keywords.
2. In Library mode do culling (The act of culling; The process of selecting for acceptance or removal). Choose collection to show clients using the filter options by staring with "1". Select 10-20 for BLOG and Facebook and mark red. Delete remaining from disk.
3. Color Correct all images stared "1", sync develop settings as possible. After color correct is complete, 'select all', and hit Apple+S, or on the menu, Metedata, Save metedata to file. This saves an XMP alongside the RAW file. Based on my research an XMP is a small file that retains all your Lightroom adjustments alongside your RAW file, referred to as a sidecar file.
4. Export Files For Client Gallery. I've been using Zenfolio, and found a plugin called Jeffrey Friendl's 'Export to Zenfolio' Plugin. It exports web-formatted JPGs and uploads them to a new gallery folder which I create, all in one step. It takes a while but you can just walk away from your computer or do something else in the meantime. Easy.
a. I create a gallery name that lands on the Home Page, and select to sort gallery by date taken.

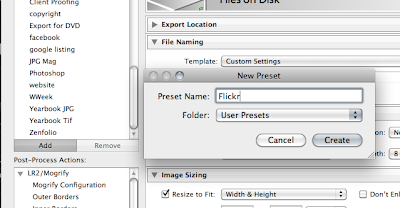
I have to make a side note. Any export settings I use often, say exporting for blog, for editing, for zenfolio, for print, ect I save. I do this by making all my export selections and clicking Add under the Presets section on the left of the Export menu. Saves lots of time!
5. Edit Favorites in Photoshop for Blog, Website, and Facebook. I select all my red marked images and use my custom Photoshop preset to export:

a. Export To: Same folder as original photo.
b. Check Add to This Catalog & Stack with Original. This will automatically add the file to your catalog and place it right next to the original RAW file.
c. I keep the file name the same.
d. File Setting: 100% quality JPG, AdobeRGB (1998).
e. I don't check anything else. Make sure it's all full resolution.
6. Open files in Photoshop, edit (I use Jesh De Rox Colorshift actions which I love!) After I'm done I flatten, save as JPG, and close. When you jump back over to Lightroom you'll see all your adjustments from Photoshop.
7. Export for web using my preset for Blog or Website.
8. Make all adjustments and preparations for print order.
9. Final backup to external hard-drive and DVD. I use Toast as my burning software. It's easy to use with a thorough set of menu options.
And that completes my digital workflow! Now comes the best part, share what your favorite editing tricks are, what you learned, or how I could improve my process. I love your feedback and hope this can be like a forum of inspiration, information, and daily doses of happiness.
Have a wonderful weekend, enjoy some sun, and I'll see ya bright and early Monday!


3 comments:
Thank you for this! Very helpful :)
You are welcome Stephanie, it is my pleasure to share with you!
I love LOVE Lightroom for my workflow too even though I am still trying to get the hang of it :) Now if only I can organize my external h-drive better......
Post a Comment